
This tutorial shows how you can create your very specific event listener in Keycloak. Keycloak supports almost 100 different event types. The example we're building in this tutorial will email an admin on every new registration. In this way somebody of the company will be notified whenever a new user signs up. The repository of the example can be found here.
How to create the listener?
In order to implement a custom event listener you need to implement the org.keycloak.events.EventListenerProvider interface. The function onEvent will be called on every event that happens in Keycloak. In this example we catch the REGISTER event and notify an admin user about the new registration.
1@Override
2public void onEvent(Event event) {
3
4  if (EventType.REGISTER.equals(event.getType())) {
5    log.infof("## NEW %s EVENT", event.getType());
6    log.info("-----------------------------------------------------------");
7
8    RealmModel realm = this.model.getRealm(event.getRealmId());
9    UserModel newRegisteredUser = this.session.users().getUserById(realm, event.getUserId());
10
11    String emailPlainContent = "New user registration\n\n" +
12        "Email: " + newRegisteredUser.getEmail() + "\n" +
13        "Username: " + newRegisteredUser.getUsername() + "\n" +
14        "Client: " + event.getClientId();
15
16    String emailHtmlContent = "<h1>New user registration</h1>" +
17        "<ul>" +
18        "<li>Email: " + newRegisteredUser.getEmail() + "</li>" +
19        "<li>Username: " + newRegisteredUser.getUsername() + "</li>" +
20        "<li>Client: " + event.getClientId() + "</li>" +
21        "</ul>";
22
23    DefaultEmailSenderProvider senderProvider = new DefaultEmailSenderProvider(session);
24
25    try {
26        senderProvider.send(session.getContext().getRealm().getSmtpConfig(), "admin@example.com", "Keycloak - New Registration", emailPlainContent, emailHtmlContent);
27    } catch (EmailException e) {
28        log.error("Failed to send email", e);
29    }
30
31    log.info("-----------------------------------------------------------");
32  }
33}
34
In order to be able to register this custom event listener class in Keycloak you will need to implement org.keycloak.events.EventListenerProviderFactory interface and return the newly created class in the create method.
1public class CustomEventListenerProviderFactory implements EventListenerProviderFactory {
2    @Override
3    public EventListenerProvider create(KeycloakSession keycloakSession) {
4        return new CustomEventListenerProvider(keycloakSession);
5    }
6
7    @Override
8    public void init(Config.Scope scope) {
9
10    }
11
12    @Override
13    public void postInit(KeycloakSessionFactory keycloakSessionFactory) {
14
15    }
16
17    @Override
18    public void close() {
19
20    }
21
22    @Override
23    public String getId() {
24        return "custom-event-listener";
25    }
26}
27
The final step before we can package our listener is to create the following file src/main/resources/META-INF/services/org.keycloak.events.EventListenerProviderFactory. This will make sure that Keycloak can discover the new Listener.
it.aboutbits.CustomEventListenerProviderFactory
You can find the file in the example repository here.
How to deploy the artifact?
Once you created the artifact you have to copy the jar into your keycloak installation (/opt/keycloak/providers/).
If you are using docker to run your Keycloak instance you can do the following:
1version: "3.7"
2
3services:
4 keycloak:
5 image: quay.io/keycloak/keycloak:19.0.3
6 command: start-dev
7 environment:
8 KC_LOG_LEVEL: info
9 KC_DB: postgres
10 KC_DB_URL: jdbc:postgresql://postgres/keycloak
11 KC_DB_USERNAME: keycloak
12 KC_DB_PASSWORD: password
13 KEYCLOAK_ADMIN: admin
14 KEYCLOAK_ADMIN_PASSWORD: password
15 volumes:
16 - ./custom-event-listener/target/custom-event-listener.jar:/opt/keycloak/providers/custom-event-listener.jar
17 depends_on:
18 - postgres
19 ports:
20 - 8080:8080
21
22 postgres:
23 image: postgres:12
24 environment:
25 POSTGRES_DB: keycloak
26 POSTGRES_USER: keycloak
27 POSTGRES_PASSWORD: password
28 ports:
29 - 5432:5432
30
31 mailhog:
32 image: mailhog/mailhog
33 ports:
34 - 8025:8025
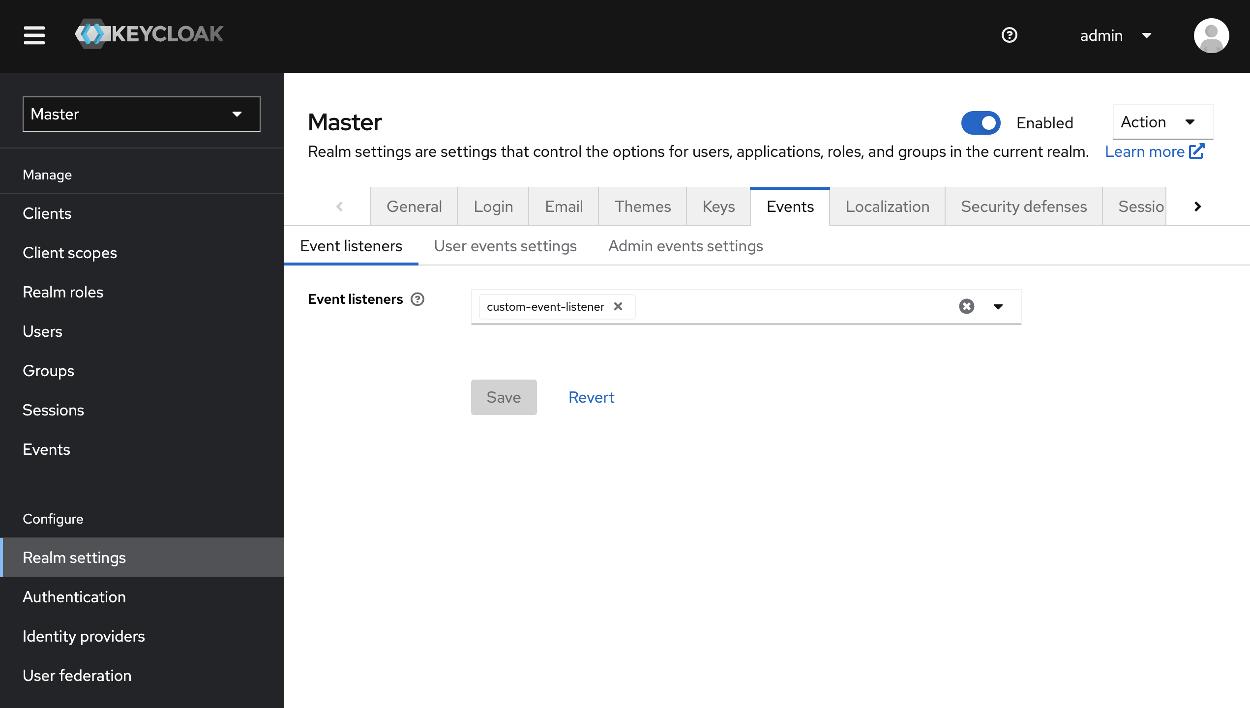
35How to enable the listener?
You're almost done. The listener should now be available in the list of event listeners. All you have to do now is to select the listener from the dropdown of available event listeners and save.
To see a running example checkout the repository and follow the instructions in the readme.